Ever wondered how those simple red blocks holding up buildings get made? You see millions of bricks everywhere. In homes, offices, and schools. But how are bricks manufactured from just clay and water? The process is actually fascinating. It combines ancient techniques with modern technology. From digging clay to burning it at extreme temperatures, each step transforms soft earth into the rock-solid bricks that build our world.
Let’s walk you through the complete manufacturing journey. You’ll understand exactly what happens from clay pit to construction site.
The Main Ingredients in Brick Making
Before we jump into how are bricks made, let’s understand what goes into them.
- Clay: This is the star ingredient. Not just any clay works—manufacturers need specific clay minerals that can withstand high heat without crumbling.
- Sand: Mixed with clay to prevent excessive shrinkage. Too much clay alone cracks during drying and firing.
- Water: The binding agent that makes everything workable. Think of it like the egg in a cake recipe—it holds everything together.
- Additives: Some manufacturers add materials like lime, iron oxide, or magnesia. These control color, strength, and other properties.
But the magic happens in how they’re processed.
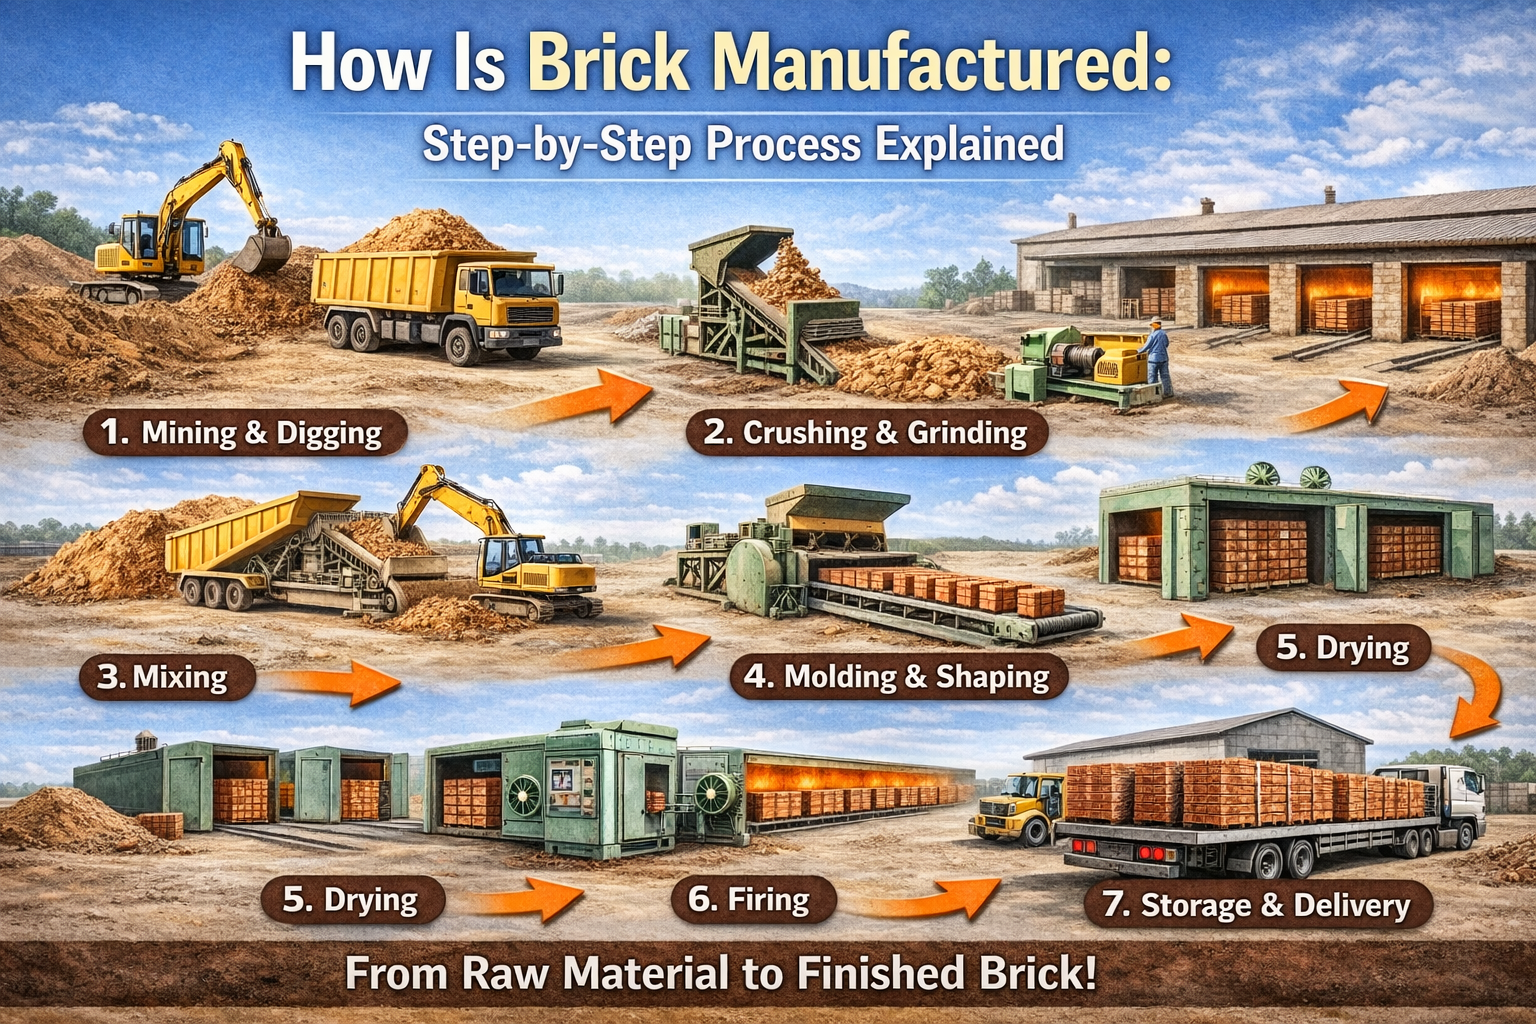
Step 1: Clay Preparation
This is where how are bricks manufactured truly begins. Getting the clay ready is crucial.
Removing Top Soil
The top 200mm of soil contains too many impurities, roots, stones, and organic matter. This layer gets removed and discarded. Only the pure clay underneath gets used for brick making.
Digging and Storing
Large diggers excavate clay from deposits. The clay is then piled in heaps about 600-1200mm high. These heaps sit exposed to the weather for weeks, sometimes months. Rain, sun, wind, all work on the clay.
Weathering
This exposure isn’t accidental. It’s called weathering. The process softens the clay naturally and improves its workability. Alternate wetting and drying breaks down clay particles. This makes molding easier later.
Cleaning
Next, the clay gets cleaned thoroughly. Stones, pebbles, plant matter—everything unwanted gets removed. For clay with many impurities, manufacturers wash and screen it. This adds cost but ensures quality.
Blending
Different clay types often get mixed together. This creates consistent properties throughout the batch. Additives like sand or ash get spread on top, then mixed uniformly. Machines handle this for large quantities.
Tempering
Finally, water is added and the clay gets kneaded. Traditionally, this meant having people or cattle walk on it. Modern manufacturers use machines called pug mills. These mix clay and water thoroughly, removing air pockets and creating a uniform, plastic mass. The clay is now ready for shaping.
Step 2: Molding and Shaping
This is where formless clay becomes recognizable bricks. Different methods are depending on scale and requirements.
Hand Molding
The traditional method. Still used for small-scale production.
Ground molding: The ground is leveled and covered with sand. A wet wooden or steel mold gets placed on it. Clay is pressed into the mold until it fills all corners. Extra clay gets scraped off. The mold lifts up, leaving a raw brick on the ground.
A skilled worker can mold about 750 bricks daily this way.
Table molding: Same process, but done on a table instead ofthe ground. Slightly faster and cleaner, but more expensive to set up.
Machine Molding
For large-scale production, machines are essential. They’re faster, more consistent, and produce stronger bricks.
Extrusion (Wire Cutting): This is the most common method today. Clay gets pushed through a rectangular die, creating a continuous ribbon. Wires cut this ribbon into individual bricks. Perfectly uniform bricks with sharp edges. These are called wire-cut bricks.
Pressing: Clay powder with minimal water gets pressed into molds under high pressure. This creates extremely dense, strong bricks. Machine-made bricks are heavier, stronger, and more uniform than handmade ones.
Step 3: Drying Process
Freshly molded bricks contain 15-30% water. This moisture must be removed before firing. Why? If wet bricks go directly into kilns, steam forms inside. The pressure causes cracks and distortions. Ruined bricks.
Natural Drying
Bricks are placed in sheds with open sides. Air circulates freely while the roof protects from rain. Drying continues until the moisture content drops to 5-7%. This typically takes 7-14 days, depending on the weather.
Artificial Drying
Large manufacturers use drying chambers or ovens. These provide controlled temperature and humidity. Artificial drying is faster, often just 24-48 hours. It’s also weather-independent, allowing year-round production. Modern facilities use heat from the kilns to dry new batches. This saves energy significantly.
Step 4: Loading the Kiln (Hacking)
Dried bricks need to be loaded into kilns for firing. This process is called hacking. Bricks get stacked on kiln cars (in tunnel kilns) or directly in the kiln chamber. The stacking pattern matters, it affects how heat circulates and influences the final color. Robots or mechanical systems often handle this in modern facilities. They stack thousands of bricks precisely and quickly. Bricks placed face-to-face develop a more uniform color than those stacked differently. Quality brick manufacturers pay attention to these details.
Step 5: Firing and Burning
This is the most critical step. It transforms soft clay into hard, durable bricks.
The Temperature Journey
Firing happens at temperatures between 900°C and 1300 °C. The process takes 10-40 hours, depending on kiln type.Three important stages occur:
- Dehydration (400-650°C): Remaining water evaporates. The clay loses plasticity permanently. Some carbonaceous matter burns off.
- Oxidation (650-900°C): Chemical changes begin. Iron compounds in clay create the characteristic red color. The brick structure starts forming.
- Vitrification (900-1300°C): Clay particles fuse together. The mass becomes tight, solid, and non-absorbent. This is where strength develops.
Too little heat? Weak, soft bricks. Too much heat? Bricks deform and melt.
Types of Kilns
- Clamp kilns: Temporary structures. Low cost but also low efficiency. Only about 60% of bricks turn out well. Used for small-scale production.
- Intermittent kilns: The kiln heats up, fires a batch, then cools down. The process repeats for each batch.
- Tunnel kilns: The modern standard. Bricks move through a long tunnel on cars. Different sections maintain different temperatures. Extremely efficient and can fire continuously.
Most modern manufacturers use gas-fired tunnel kilns. They provide consistent temperature control and better quality.
Step 6: Cooling
After reaching peak temperature, controlled cooling begins. Sudden cooling causes thermal stress. Bricks crack or warp. Gradual cooling prevents this. In tunnel kilns, cooling rarely exceeds 10 hours. In periodic kilns, it might take 5-24 hours. Interestingly, the cooling rate affects brick color. Faster cooling creates different shades than slow cooling.
Step 7: Unloading (De-hacking)
Once cooled, bricks get unloaded from kilns. This is called de-hacking. Robots often perform this task in modern facilities. They’re faster and more consistent than manual labor. During unloading, bricks get sorted and graded. Perfect bricks for structural work. Slightly imperfect ones for less critical applications. Broken pieces get discarded or recycled.
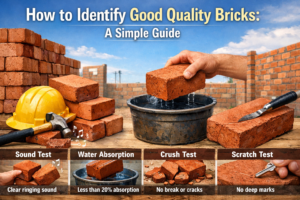
Step 8: Quality Testing
Reputable manufacturers test every batch before releasing it.
- Compressive strength test: Bricks are crushed to measure how much weight they can handle.
- Water absorption test: Bricks are soaked in water to measure absorption percentage.
- Dimensional check: Random samples are measured for size accuracy.
- Visual inspection: Color uniformity, surface quality, edge sharpness—all get checked.
Only bricks meeting standards proceed to packaging.
Step 9: Packaging and Storage
Finally, approved bricks get packaged for delivery. Modern packaging uses strapped cubes. These self-contained units can be handled by forklifts easily. They protect bricks during transportation and storage. Bricks are stored in organized yards until buyers need them. Proper storage prevents damage from weather and handling.
Conclusion
Understanding how bricks are manufactured helps you appreciate the complexity behind these simple-looking building blocks. From clay pit to construction site, each step matters. Proper preparation, precise molding, adequate drying, and controlled firing all contribute to final quality. When choosing bricks for your project, consider the manufacturer’s process. Do they use modern equipment? Do they test regularly? Can they demonstrate consistent quality? Quality manufacturing creates bricks that last for generations. Poor manufacturing creates problems that appear within years. The process hasn’t changed fundamentally in centuries. Clay, water, and fire still create bricks. But modern technology and quality control have perfected what was once an art.